Thinkpad W530, Red Hat Enterprise Linux 6, Fedora and Windows 8 Multiboot

Now that we’ve successfully done a clean Windows 8 install on the W530 and got it dual booting with Fedora 17, it’s now time to add another distribution onto the laptop – Red Hat Enterprise Linux 6.

My first attempts to install RHEL 6.3 onto the W530 resulted in the graphics failing to load by the installer. This resulted in the screen displaying a strobing set of psychedelic colours. A few Red Hat Knowledge-base articles which might be relevant:

RHEL6 does not boot on Lenovo W520 Laptop with Discrete option selected to choose nVidia GPU

Blank screen during installation when using certain NVIDIA Quadro Graphics Adapters under Red Hat Enterprise Linux 6

Why won’t the Nvidia driver compile/install/load under Red Hat Enterprise Linux 6

I don’t recall exactly what settings I initially tried in the BIOS for display type which offers the following options:

  • “Integrated” – uses built-in Intel Integrated Graphics Controller”
  • “Discrete” – uses nVidia Graphics
  • “nVidia Optimus” – uses the built-in Intel Integrated Graphics Controller but allows the OS to use nVidia when needed (supported only with Windows 7 and Window 8)

Anyhow, I attempted to install with the following options on the kernel command line:

xdriver=vesa nomodeset

From what I can tell, that should have allowed the installer’s X Server to start successfully, but it did not. However, the installer helpfully told me that I could use a VNC client to perform the Red Hat install.

I told the installer to select /boot/efi as the EFI install partition, the one shared with Windows 8 and Fedora.

After the install, I was given the option to start Windows 8 or Red Hat Linux. The Fedora choice was no longer listed. Fortunately, there was a backup /boot/efi/EFI/redhat/grub.conf.rpmsave which contained the Fedora/Windows 8 option. It’s now just a case of merging the Red Hat and Fedora 8 grub files.

Here’s the result:

boot=/dev/sda2
device (hd0,5) HD(2,96800,32000,ad8e8d71-db62-4c7a-8603-5bc6ce875d52)
default=0
timeout=7
splashimage=(hd0,5)/grub/splash.xpm.gz
hiddenmenu
 title Fedora (3.6.11-1.fc17.x86_64)
  root (hd0,5)
  kernel /vmlinuz-3.6.11-1.fc17.x86_64 rd.md=0 rd.lvm=0 rd.dm=0 KEYTABLE=us SYSFONT=True rd.luks=0 root=UUID=a6f32b89-45ac-410f-8a1e-562b441304e3 ro LANG=en_US.UTF-8 rhgb quiet
  initrd /initramfs-3.6.11-1.fc17.x86_64.img
 title Windows 8
  set root=(hd0,gpt1)
  chainloader /EFI/Microsoft/Boot/bootmgfw.efi
 title Red Hat Enterprise Linux (2.6.32-279.el6.x86_64)
  root (hd0,8)
  kernel /vmlinuz-2.6.32-279.el6.x86_64 ro root=UUID=fe96af7b-07bd-451e-b4de-4eec673f4cca nomodeset rd_NO_LUKS KEYBOARDTYPE=pc KEYTABLE=us LANG=en_US.UTF-8 rd_NO_MD SYSFONT=latarcyrheb-sun16 crashkernel=auto rd_NO_LVM rd_NO_DM rhgb quiet xdriver=vesa
  initrd /initramfs-2.6.32-279.el6.x86_64.img
 title Windows 8
  rootnoverify (hd0,3)
  chainloader +1
title Fedora
  rootnoverify (hd0,6)
  chainloader +1

Thinkpad W530 Windows 8 And Fedora Dual Boot

So after our Windows 8 clean install on Thinkpad W530 we had our W530 booted up and running Windows 8 in Secure Boot mode. I’ll do an in-depth write up about setting up a boot server to serve out Fedora, Red Hat Enterprise Linux and Centos in both UEFI and BIOS, 32-bit and 64-bit flavours later. But for now, let’s assume we have Fedora 17 64-bit, UEFI install server.

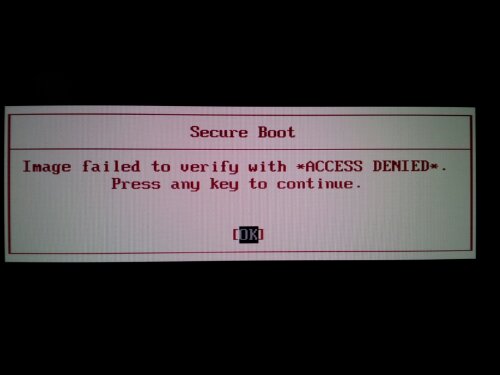
I normally hit F12 on the W530 to bring up the boot menu and select the network card as the bootable device. If you try to boot from the Fedora install media with Secure Boot enabled, you’ll get the error shown below: “Secure Boot: Image failed to verify with *ACCESS DENIED*.  Press any key to continue”.

Windows Secure Boot Access Denied Screenshot

So, first thing to do is to disable Secure Boot via the BIOS.

The disabling of Secure Boot shouldn’t be necessary once Fedora 18 is released, since it will contain a first-stage bootloader, shim, which holds a Fedora-specific public key. Shim will then validate against the Fedora-defined key which has been signed by Microsoft. More details here.

So, for now we move onwards with dual booting Windows 8 and Fedora 17 without Secure Boot. Firstly, it’s worth pointing out that for the Fedora install you don’t need change any BIOS settings relating to graphics options. I used “Nvidia Optimus” (runs with integrated graphics but with discrete graphics on demand” with “O/S Detection Enabled”. Follow the usual install process with the following notes: in my install I chose to create a 400MB filesystem for /boot (on ext3), 8GB for swap and 20GB for the / filesystem (ext4). I selected the second partition (/dev/sda2) as /boot/efi and was sure not to check “format”. I then chose to install GRUB into /boot/efi.

My partition table looks similar to this:
Number Start (sector) End (sector) Size Code Name
1      2048    616447 300.0 MiB 2700 Basic data partition
2    616448    821247 100.0 MiB EF00 EFI System Partition
3    821248   1083391 128.0 MiB 0C01 Microsoft reserved part
4   1083392 116426751  55.0 GiB 0700 Basic data partition
5 116426752 200312831  40.0 GiB 0700 Microsoft basic data
6 200312832 201132031 400.0 MiB 0700 Linux filesystem
7 201132032 243075071  20.0 GiB 0700 Linux filesystem
8 243075072 259852287   8.0 GiB 8200 Linux swap

Once the install has completed, the machine will boot and present you with a grub menu from which you can chose Windows 8 or Fedora.
The grub configuration can be seen Number in /efi/EFI/redhat /grub.conf and will probably look like this:

boot=/dev/sda2
device (hd0,5) HD(2,96800,32000,ad8e8xxxx-db62-4c7a-8603-5xxxxxxx)
default=1
timeout=7
splashimage=(hd0,5)/grub/splash.xpm.gz
hiddenmenu
 title Fedora (3.6.8-2.fc17.x86_64)
  root (hd0,5)
  kernel /vmlinuz-3.6.8-2.fc17.x86_64 rd.md=0 rd.lvm=0 rd.dm=0 KEYTABLE=us SYSFONT=True rd.luks=0 root=UUID=a6f32b89-45ac-410f-8a1e-562b441304e3 ro LANG=en_US.UTF-8 rhgb quiet
  initrd /initramfs-3.6.8-2.fc17.x86_64.img
 title Windows 8
  set root=(hd0,gpt1)
  chainloader /EFI/Microsoft/Boot/bootmgfw.efi

It’s worth pointing out that I tried the Fedora 18 beta install on the W530. Unfortunately, the installer is still a little bit unstable and crashed out on me when attempting to partition the drive. Fedora 17 is very usable and right now I don’t need any of the new Fedora 18 features, so no big loss.

One final thing I like to do is mount up the FAT32 Windows D drive under /Windows/D – this enables me to transfer files between Windows and Linux as needed.

The following line in /etc/fstab will do the job, after creating /Windows/D under Fedora:

/dev/sda5       /Windows/D      vfat    defaults 0 0

Now that the Fedora install is complete and we can easily switch between Windows 8 and Fedora 17, we can customise our Fedora install.  However, before we do that we’re going to install Red Hat Linux Enterprise and add that as a third boot option.

Thinkpad W530 Windows 7 (Legacy BIOS/MBR) to Windows 8 (UEFI/GPT/Secure Boot) Upgrade

Back in March 2006, I took delivery of a brand new Thinkpad T60P. At the time, I wrote a Thinkpad T60P (200793U) Windows XP Install guide, showing how to slipstream a clean Windows XP image with the latest drivers and thinkpad utilities onto the laptop.

Well, I’ve recently upgraded to a Thinkpad W530 (2438-2KU) with Windows 7 pre-installed. Since Microsoft is offering an upgrade discount via Windows 8 Upgrade offer, I thought I’d document the process of getting a clean Windows 8 install onto the W530 laptop along with the latest available drivers, whilst still preserving the pre-installed tools.

Caution: these are my own individual notes, and I take no responsibility for any damage that may be caused by following these instructions. Your mileage may vary.

Step 1

After the very first boot up of the W530, you can go ahead and follow the prompts for computer name, user information, network setup, etc. Enter all these details, although bear in mind you’ll have to enter them again as part of the Windows 8 setup.

Step 2

It’s important to get back to the current “original factory state” in case anything goes wrong and the pre-installed recovery partition is lost.

From Lenovo ThinkVantage Tools, select “Factory Recovery Disks – Use Lenovo ThinkVantage Recovery Media to save a copy of your factory preload image”.

At the prompt where it asks “Select the recovery media you want to create”, be sure to choose both Boot Media AND Data Media.

I chose to use TDK DVD+R media. The creation of the images takes about 30 minutes. Once done, keep them safe!

Step 3

Shrink the C drive. By default, the C drive takes up most of the 500GB drive, but as I’m ultimately going to dual boot with various Linux distributions such as Fedora and Red Hat Linux Enterprise I chose to shrink it. (Update – as we see later, we actually end up wiping the disk as part of the process of moving to a GPT partition table, so you can skip this step!)

Step 4

Being extra paranoid, I also decided to backup the partitions to a local USB hard drive (a WD MyBook Essential Edition) using Clonezilla. I downloaded the clonezilla-live-20120620-precise.iso ISO file and used Lili USB Creator to make a bootable Clonezilla Live USB stick. You could use also use a CD or other tool to get Clonezilla booted up.

After booting Clonezilla, we see that there are 3 NTFS partitions by default on the W530 (remember, I’d shrank my C: drive in Step 3):

sda1 – 1573 MB SYSTEM_DRV
sda2 – 62.1 GB Windows7_OS
sda3 – 14.7 GB Lenovo_Recov

Using Clonezilla, I chose the option “device-image” – work with disks or partitions using images:

I chose local_dev to use a local USB drive
I selected a EXT4 partition on the MyBook, and then selected a W530 folder I had created under there
I chose to run in Expert mode, although I mainly used the default settings
I chose “saveparts” – Save local partitions as an image
I then backed up each partition above.

Step 5

As an extra precaution I ran Clonezilla one last time, this time choosing to backup the whole disk. So I selected “savedisk” – Save local disk as an image – rather than a particular partition.

Step 6

Take a backup of your Windows 7 Product key. This key is encrypted in the registry, so the best way to obtain it is to run one of the Free Product Key Finder Programs. I chose to run 2 programs to obtain the key: Magical Jelly Bean Keyfinder and ProduKey. Both of these you can simply extract the zip file and run the executable from the zip folder – you don’t need to run the installer program.

Step 7

Take a backup of the following folders to CD/DVD or a USB Drive:

C:\mfg
C:\swshare
C:\SWTOOLS

C:\SWTOOLS\Apps contains some of the applications that you can’t download from Lenovo, so be sure to take this.
C:\SWTOOLS\OSFIXES contains some microsoft patches which may be useful later.

Once the backups are done, you’re in great shape to get things ready for the Window 8 install.

Step 8

Upgrade the BIOS to one that’s Secure Boot aware.

My W530 came with BIOS G5ET30WW, which was at UEFI version 1.08 and ECP (Embedded Controller Program version) version 1.06. Lenovo System Update brought this up to UEFI 1.11 and ECP 1.07.

However, for full Windows 8 Secure boot support, version 2.XX is needed. Note that the Lenovo System Update in Windows 7 did not show a BIOS update was available after I was running at 1.11. However, Version 2.06 was available from Lenovo W530 Drivers and software so I simply installed that from the website. It’s worth reading the release notes with the upgraded BIOS – if you’ve jumped from version 1 to version 2 you’ll need to import the Window 8 keys. Choose “Security” then “Secure Boot” to show the menu. Select “Restore Factory Keys” and press Enter. Select “Yes” to restore Factory keys. (You may have to turn off Secure Boot until you are ready to upgrade in Step 12).

Step 9

Register on Windows Upgrade Offer

Download Upgrade Assistant, run the application, follow the purchase process and ultimately chose to create a bootable Windows 8 Upgrade image. I chose to create an ISO image and placed it on the desktop. I then burnt this to DVD.

Step 10

Optionally run the Lenovo Drive Grabber to fetch all drivers that are available for the W530. These can be saved on a USB drive for applying to the Windows 8 system. It saves having to download the files on your Windows 8 system later and save file system fragmentation. You could also include Firefox, Chrome, MS Office and MS Service packs to this same USB drive.

Step 11

Now comes the interesting part. I wanted to convert my Windows 7 install which uses Legacy BIOS to boot with an MBR disk into a Windows 8 install with UEFI, GPT and Secure Boot. After enabling Secure Boot in the BIOS and importing the keys in the BIOS, I attempted to boot from the Microsoft Windows 8 Upgrade DVD. The drive could not be read. At first I thought this might be because I had an MBR boot partition – but that shouldn’t stop a CD from being bootable via the UEFI menu. I then came across a post which described this problem exactly: Is anyone else having problems with UEFI support with the DVD ISO created by the Windows 8 Upgrade tool?. The suggested that the Windows 8 DVD is not UEFI-bootable. Fortunately, the fix is contained in the post.

I downloaded the executable oscdimg.exe to the desktop on the W530
I inserted the Windows 8 Upgrade DVD into my drive (shown as drive H: on my W530)

I then created a new UEFI-bootable ISO and then ran the following in a command prompt:

oscdimg.exe -m -o -u2 -udfver102 -bootdata:2#p0,e,bH:\boot\etfsboot.com#pEF,e,bH:\efi\microsoft\boot\efisys.bin H:\ C:\path\to\new\win8pro-uefi.iso

Note that “H” in the above command should be replaced the drive letter where the DVD is mounted.

The utility will create a new UEFI-bootable ISO file at C:\path\to\new\win8pro-uefi.iso

Step 12

With Secure Boot enabled you can now boot the UEFI-bootable Windows 8 Upgrade DVD. However, it won’t be possible to install Windows 8 onto the drive unless you convert it from an MBR partition layout into a GPT one. The first time I ran the install, I removed all partitions and let Windows decide the optimum layout. The setup screen looked like the one described here – Choose a Physical Location to Install Windows 8

This provided me with:

A Rescue partition
A UEFI partition
A C: drive

Since I wanted to dual boot, I tried to reduce the C: drive after install. Unfortunately, I could not go under 200GB due to defragementation. I even tried Perfect Disk 12.5, but the drive size could not be reduced.

So, I booted from the DVD one more time (at this point, I’ve got Windows 8 already installed, and I’m booting from the UEFI Window 7 to Windows 8 upgrade DVD). This time I modified the partition sizes so that the C: drive was 60 GB.

Step 13

So, we’ve now got a fresh Windows 8 install on the W530, running secure boot with a UEFI and GPT partition table. First things first, apply Windows updates!

Step 14

At the time of writing (1 December 2012), it’s possible to get Windows 8 Media Center free of charge. So you might as well get this.

Step 15

If you’ve Microsoft Office, now is a good time to install it (along with any service packs that might be available)

Step 16

You’re now in a pretty good state, so I’d recommend performing a backup of the system. Again, follow Step 5 and use Clonezilla to take an image of your Window 8 system. It means you can always come back to this point in time.

Step 17

Install your software. This can be things like Firefox, PuTTY, WinSCP, Paint Shop Pro, Goldwave, etc. You can also install the Lenovo apps and drivers from steps 7 and 10.

Step 18

Optional – Create a D: drive for your data. For this, I like to use a FAT32 filesystem which I know can be read and written to by both Windows 8 and Linux (I know that NFTS support is a lot better in many Linux distro’s, but I’m going to be dual booting with Red Hat Enterprise Linux 6 later, and this doesn’t have the NTFS driver by default. FAT32 provides lots of flexibility.

For this, I booted from a Fedora 17 USB key and used gdisk to create a 20GB data partition, and then mkfs.vfat to create the filesystem. It can then be mounted in Windows 8.

Step 19

Enjoy Windows 8. Maybe take a look at The first 10 things you should do to a new Windows 8 desktop installation.

Our next step on the W530 will be to attempt to secure dual boot Windows 8 with Fedora 18.

London 2012 60 second countdown

So, the London 2012 Olympics are over. Right before the Isles of Wonder Opening Ceremony and the Closing Ceremony last night there was a 60 second countdown featuring a series of live-action title cards using photographs of everyday London life such as bus numbers, market signs, seats numbers, road signs and book covers.

A quick search on the web shows that this content was produced by 59 Productions.

The backing track for the video was the 120bpm Remix of “The Road Goes On Forever” by High Contrast (Lincoln Barrett). You can read more about this track and his involvement in the Olympics on his website, High Contrast in Olympics Opening Ceremony.

Here’s the 60 second Olympic countdown:

Samsung Galaxy S2 ICS Upgrade

Last weekend I successfully upgraded by Galaxy S2 to Ice Cream Sandwich, the latest version of the Android Operating System.

The upgrade was OK although I did need the Vodafone Ice Cream Sandwich Forum to get a couple of issues resolved.

Here’s the process I followed.  Disclaimer: these worked for me, but I don’t guarantee that this work for you.  These instructions are without any kind of warranty.. Always ensure you backup your phone.

Step 1: Backup photos, media, phone numbers and anything else you want from your phone.  For me, I decided I would copy over my music post-install, so I just backed up my photos to a PC using the USB lead.

Step 2: Factory reset your phone: *2767*3855#
Caution: this wipes EVERYTHING on your phone and puts it back to the state when you first had it.  When the reset completes, don’t both entering your Google account as we’ll be wiping it again post-upgrade.

Step 3: Update KIES.  In fact, what I should really say here is uninstall KIES, reboot your PC and then install the latest version of KIES (available from Samsung GT-I9100L Downloads).

Step 4: Start KIES

Step 5: Attach phone

Step 6: Start upgrade

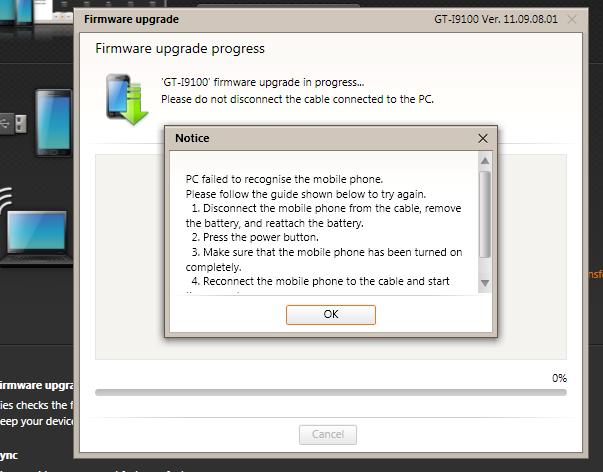
Note: I encountered the following problem:

KIES - PC Failed to recognise the phone.

This happened after the firmware has been downloaded, the Android man was appearing on the handset with the message “Downloading…do not turn off target”. It was sort of as though the handset could not download from the PC.

For me, the solution was to restart KIES, disconnect and reconnected phone. In fact, now that my upgrade is done, I’m wondering if this was down to the fact that I had upgraded KIES using it’s “Check For Update” rather than a clean un-install, re-install as mentioned in Step 3.

Step 7: Allow upgrade to complete

Step 8: Perform a Factory reset by dialling *2767*3855#

This was mentioned on the Vodafone forums – apparently KIES/Android may have left some of the older Gingerbread 3.2.5 files around on the phone and this would clear it? In any case, pre-upgrade my phone would stop playing music or podcasts and random times and others had reported that a factory reset would do this. So, cleaning up would mean nothing to lose.

Step 9: Sync your google account. By default most of your Google Play apps will be re-installed, but if you downloaded any apps manually, you may have to apply them again manually. An important tip: Switch off the mobile/cell data network and connect to a WiFi signal while you perform the sync – you will save your data allowance.

Tikiwiki Migration to WordPress Notes – Part 3

After migrating from TikiWiki, you will probably want to rewrite any old links to the new pages. In my case, all of my articles had a url ending articleXXX.html. If you have any links in the database that were using these names, you can find them with this:

grep -o “….article[0-9]….” dump.sql

Where dump.sql is a MySQL dump of your WordPress database. You can then update any articles using the WordPress editor accordingly.

To catch external sites that may have references articleXXX.html or (in Tiki’s default formats of tiki-read_article.php?articleId=XXXX or tiki-print_article\.php?articleId=XXX) then the following apache rules should do the job:

rewritecond %{HTTP_HOST} ^www\.richii\.com(:80)?$ [NC]
rewritecond %{REQUEST_URI} ^/tiki-read_article\.php$ [OR]
rewritecond %{REQUEST_URI} ^/tiki-print_article\.php$
rewritecond %{QUERY_STRING} articleId\=([0-9]+)
RewriteRule ^(.*)$ http://www.richii.com/?p=%1 [R]

RewriteRule ^/article([0-9]+)([A-Za-z.]+)$ /?p=$1 [R=301,L]
RewriteRule ^/article([0-9]+)$ /?p=$1 [R=301,L]

That should send people from articleXXX.html to /?p=XXX. Then, if WordPress is using SEO-friendly URL’s, it will then send folks to /seo-friendly-article-name

Whilst of the subject of links, it’s worth checking that all of your outbound links are good. A good module that can do this is Broken Link Checker. To set this up, first activate Broken Link Checker in modules. Then go to configure and select:

Which Links to Check: Add:
Embedded YouTube videos
Embedded YouTube videos (old embed code)
Embedded DailyMotion videos

Protocols and API’s:
YouTube API

Check the plugin website for more documentation of this plugin.

One nice WordPress Plugin is WPTouch. I’m not sure if there’s a similar feature in Tikiwiki, but this plugin converts a WordPress site into an application-like theme, complete with ajax loading articles and effects when viewed from the mobile devices like the iPhone, iPod touch, Android mobile devices, Palm Pre/Pixi and BlackBerry OS6 mobile devices.

The install is fairly simple, just search for WPTouch in the Plugins section and download and activate it.

To configure it, just go to Settings -> WPtouch

One option you may wish to disable:
Enable Email Menu Item (Uses default WordPress admin e-mail)

Finally, you will probably want a Contact Form of some sort. One that comes highly recommended in many guides is Fast Secure Contact Form. Install through the Plugins Menu and you’ll then the options under Plugins -> Fast Secure Contact Form Options. You can probably accept the defaults, but perhaps disable “Accept Meeting Requests via vCita”

Tikiwiki Migration to WordPress Notes – Part 2

This article follows up on Tikiwiki Migration to WordPress Notes – Part 1. You’ve now got a working WordPress site with your old TikiWiki articles in it. However, there’s some further imports we can do to use some of the Tiki features such as topic images.

One nice feature in Tikiwiki is that each article/topic was assigned an icon. To get these icons into WordPress, there are a couple of steps.

First, you’ll want to upload your topic images from Tikiwki into WordPress. The easiest way to do this is to install the plugin Add From Server. Once installed, check the settings under Settings -> Add From Server.

Under User access Control select:
Any users with the ability to upload files listed below : admin

Copy over images from Tikiwiki (probably in images/topics) to /path/to/website/wp-content/

Then click on media -> Add From Server

The images should all get uploaded and appear somewhere like /path/to/website/wp-content/uploads/2003/11/stuff.gif

The next step is associate each icon with a category. This is done in the WordPress database.

I should stress at this point that the following steps are at your own risk and are unsupported. Although this worked for WordPress 3.3.1 in my environment, there’s no guarantee that this will work for you. And ALWAYS back up your database prior to performing any database changes.

Here’s the basic process.

The uploaded files now appear in the wp_postmeta table. Let’s say I want to associate all the ‘dotdance’ topics with my dotDance icon.

Step1: Identify the post_id for the image you want to use:

mysql> select * from wp_postmeta where meta_key=’_wp_attached_file’;
+———+———+——————-+——————————+
| meta_id | post_id | meta_key | meta_value |
+———+———+——————-+——————————+
| 716 | 325 | _wp_attached_file | 2003/11/dot_dance.gif |

Make a note of the post_id associated with the image.

Step 2: Next we look in wp_terms to find the dotDance category:
mysql> select * from wp_terms;
+———+——————————+——————————+————+
| term_id | name | slug | term_group |
+———+——————————+——————————+————+
| 9 | dotDance | dotdance | 0 |

Step 3: We need to match this term_id with the term_id in the wp_term_taxonomy table:

mysql> select * from wp_term_taxonomy where term_id=’9′ and taxonomy=’post_tag’;
+——————+———+———-+————-+——–+——-+
| term_taxonomy_id | term_id | taxonomy | description | parent | count |
+——————+———+———-+————-+——–+——-+
| 16 | 9 | post_tag | | 0 | 49 |
+——————+———+———-+————-+——–+——-+
1 row in set (1.91 sec)

Step 4: We now need to find all posts with this term_taxonomy_id=16 (dotDance) category:

mysql> select * from wp_term_relationships where term_taxonomy_id = 16;
+———–+——————+————+
| object_id | term_taxonomy_id | term_order |
+———–+——————+————+
| 26 | 16 | 0 |
| 56 | 16 | 0 |
| 57 | 16 | 0 |
| 63 | 16 | 0 |

So we know post’s 26, 56, 57 and 63 are all in the (dotDance) category.

Step 5: To make these posts use our image (image id 325 found in step 1) we can simply insert entries into wp_postmeta as follows:

insert into wp_postmeta (post_id,meta_key, meta_value) values (’26’,’_thumbnail_id’,’325′)
insert into wp_postmeta (post_id,meta_key, meta_value) values (’56’,’_thumbnail_id’,’325′)
insert into wp_postmeta (post_id,meta_key, meta_value) values (’57’,’_thumbnail_id’,’325′)
insert into wp_postmeta (post_id,meta_key, meta_value) values (’63’,’_thumbnail_id’,’325′)

This can be a bit time consuming if you’ve got a lot of categories to import.

To automate the process, we can script this up.

First, create a csv file with two entries per category. The first entry should be the image id (found from ‘select post_id from wp_postmeta where meta_key=’_wp_attached_file’;) and the second should be the term id (found from ‘select term_id, name from wp_terms;’)

For the exmaple of the dotDance Category shown above this would be:
325,9

Once you’ve got your CSV file, you can upload the data into wp_postmeta by running this script:

#!/bin/bash
cat $1 | while read line
do
val1=`echo $line|cut -f1 -d,`
val2=`echo $line|cut -f2 -d,`
echo “insert into wp_postmeta (post_id,meta_key, meta_value) select wp_term_relationships.object_id, ‘_thumbnail_id’,’${val1}’ from wp_term_relationships,wp_term_taxonomy where term_id=${val2} and taxonomy=’post_tag’ and wp_term_relationships.term_taxonomy_id = wp_term_taxonomy.term_taxonomy_id;” >> /tmp/script$$
done
echo “SQL has been generated in /tmp/script$$”
echo “”
echo “Here are the contents of /tmp/script$$”
echo “”
cat /tmp/script$$
echo “Now run this sql as follows:”
echo “mysql -u –username=XXX –password=YYYY –database=ZZZZZ < /tmp/script$$”

Be sure to take a backup of your database before running the script. Here’s how you can confirm it’s worked: Before associating the featured images to the WordPress posts: mysql> select * from wp_postmeta where meta_value=’325′;
Empty set (0.01 sec)

After associating the featured images to the WordPress posts:
mysql> select * from wp_postmeta where meta_value=’325′;
+———+———+—————+————+
| meta_id | post_id | meta_key | meta_value |
+———+———+—————+————+
| 789 | 26 | _thumbnail_id | 325 |
| 790 | 56 | _thumbnail_id | 325 |

If needed, you can remove the topic associations:

mysql> delete from wp_postmeta where meta_value=’325′ and meta_key=’_thumbnail_id’;

To confirm that all is working as expected, just login to WordPress, select an article that’s been assigned to a category and look to see if “Featured Image” has been set. If you are using a theme that displays category images for articles, then it should be displaying these on either the article homepage or the article itself .